Tools for Claiming Process
This guide explains how to sign a message and complete the ZEN token claim process using official Horizen tools.
Overview of Tools
Step 1: Sign a Message
Use one of the following tools to generate a signed message:
Step 2: Submit the Claim
Use either to submit the claim:
Sign Message
Before claiming, you must generate a valid signature using the message format:
"ZENCLAIM" + destinationAddress
For example:
ZENCLAIM0x1B9aCc8d2c9e20aC2e78904e6f123f2D22Dd2A8w
This section outlines how to do this using the three available tools.
Sphere Wallet
If you have your seed phrase, you can use Sphere Testnet to sign a message.
-
Open Sphere and import your seed phrase (if not already imported).
-
Verify that your wallet addresses and balances are correct.
-
To generate a signature, click on this icon in your Sphere wallet and enter this message:
"ZENCLAIM" + destinationAddress; Example:ZENCLAIM0x1B9aCc8d2c9e20aC2e78904e6f123f2D22Dd2A8w.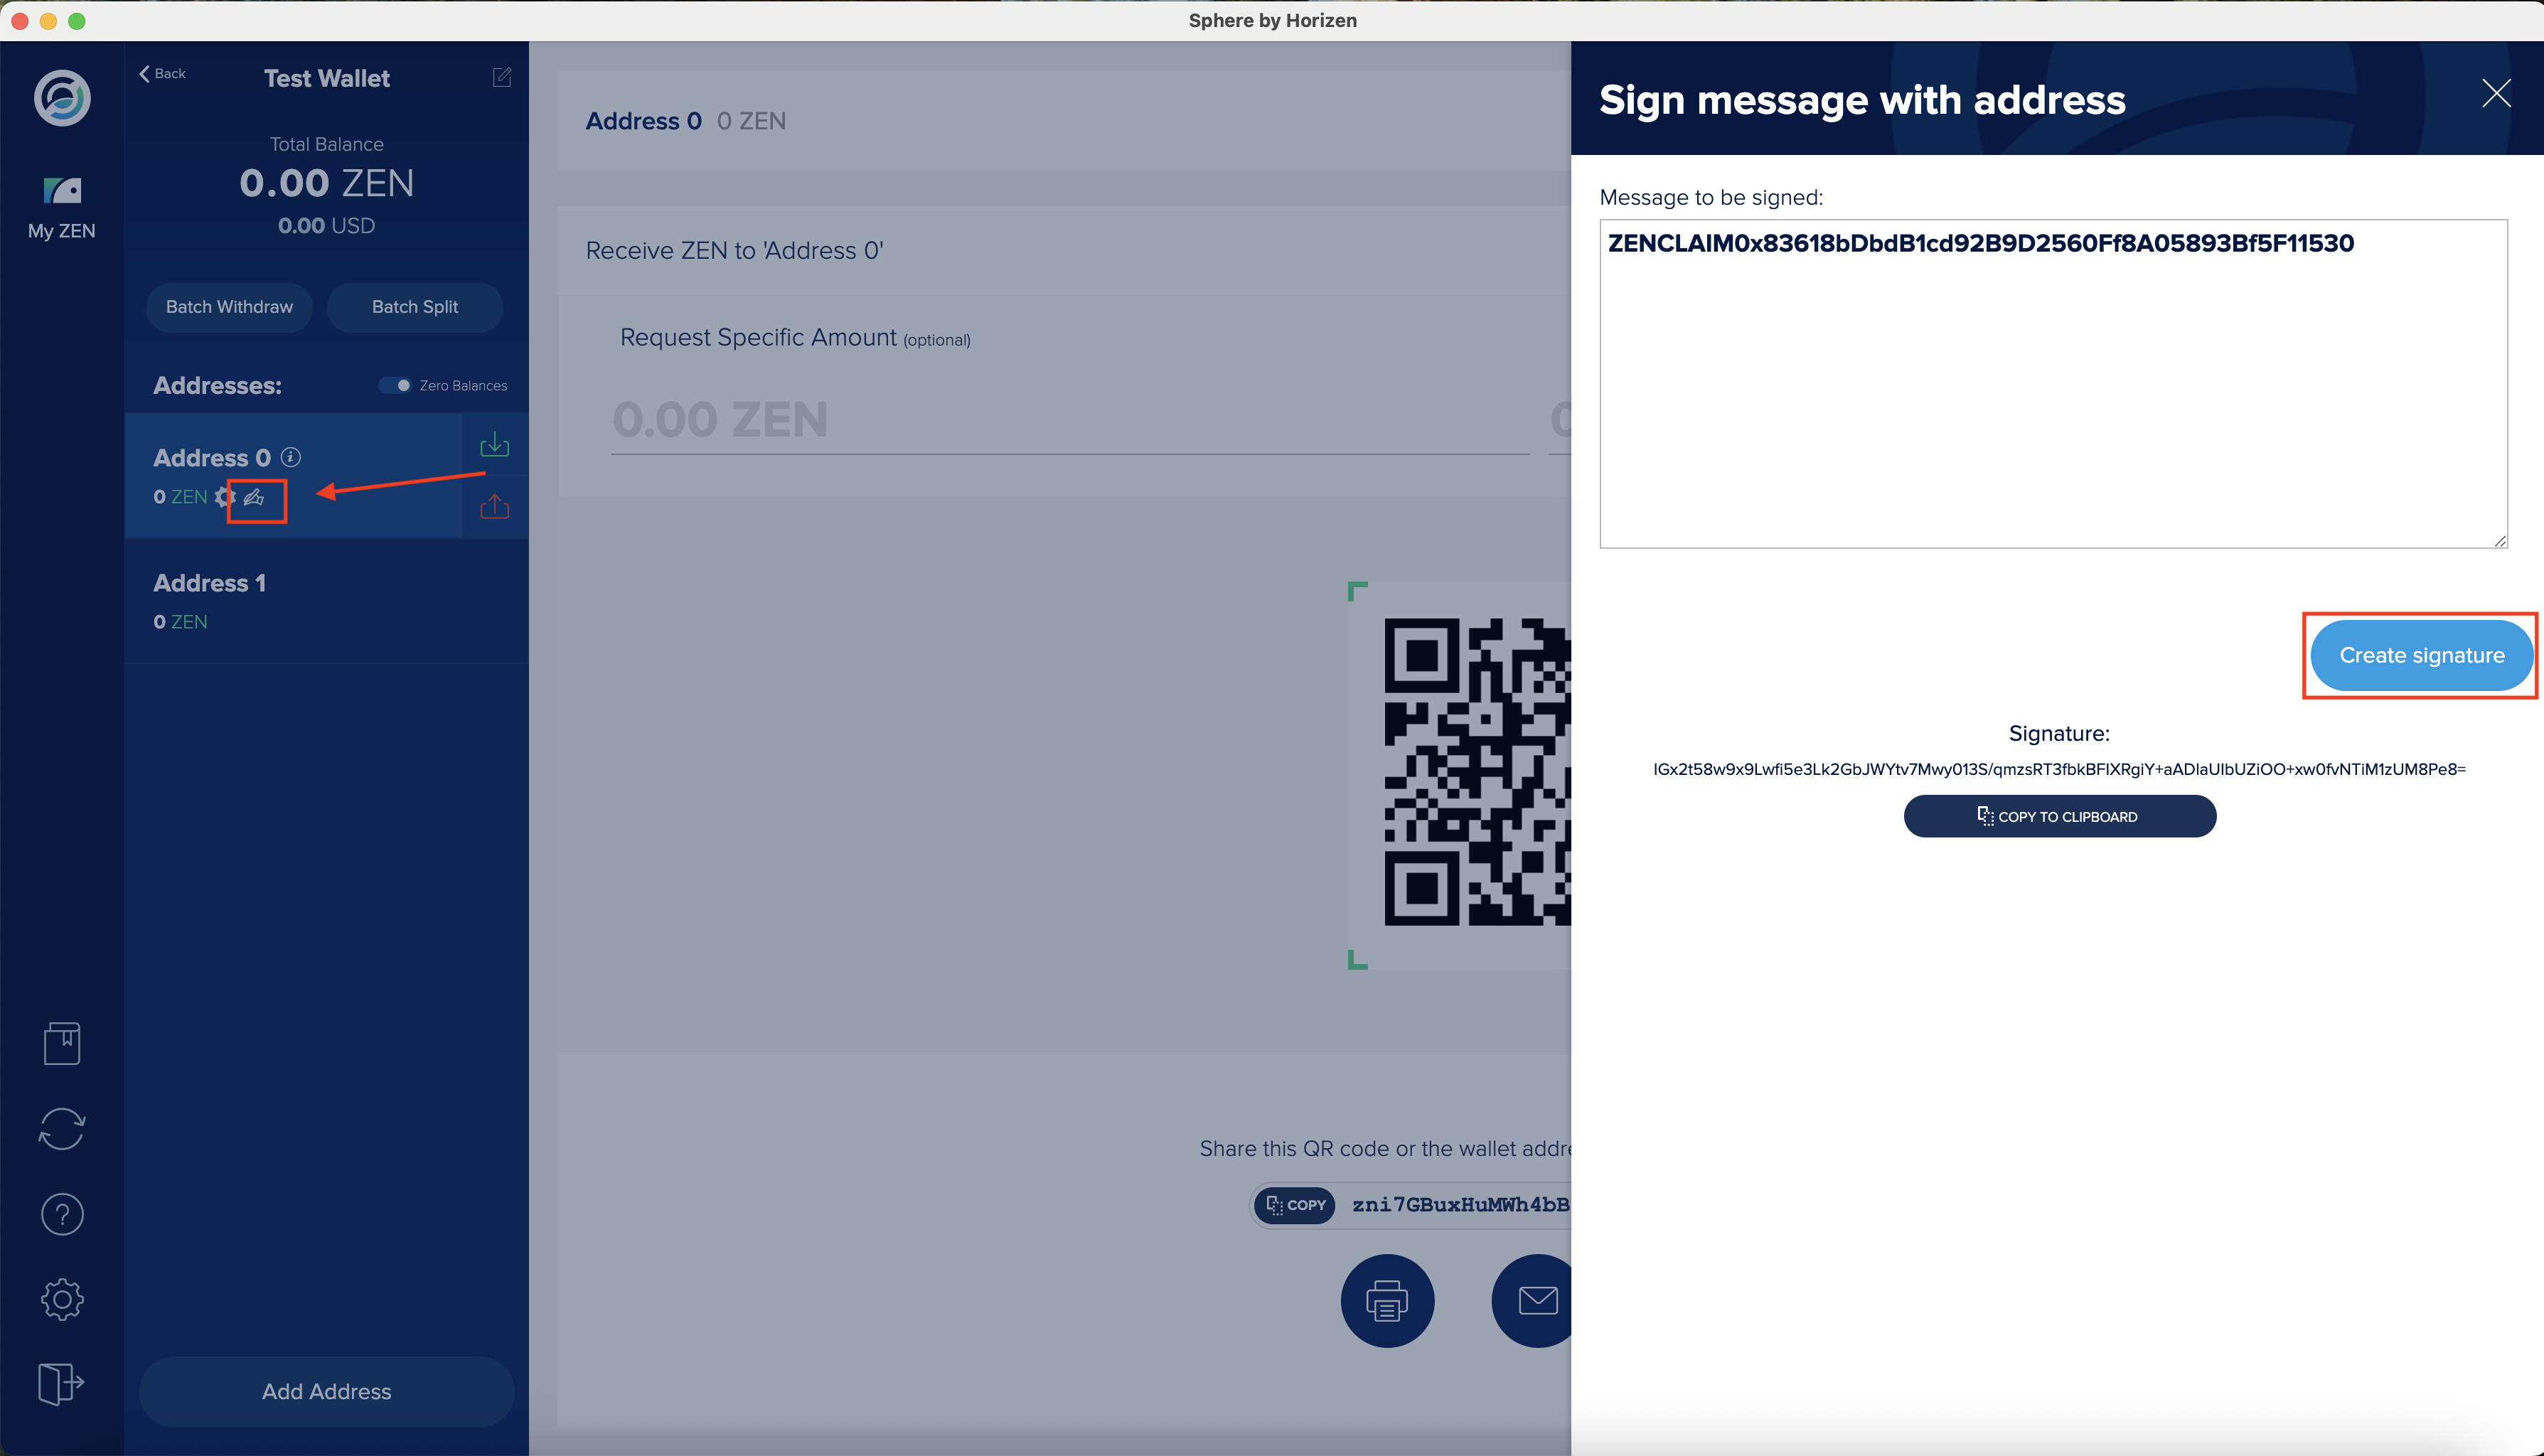
-
Click Create Signature. This will be used in the claim process.
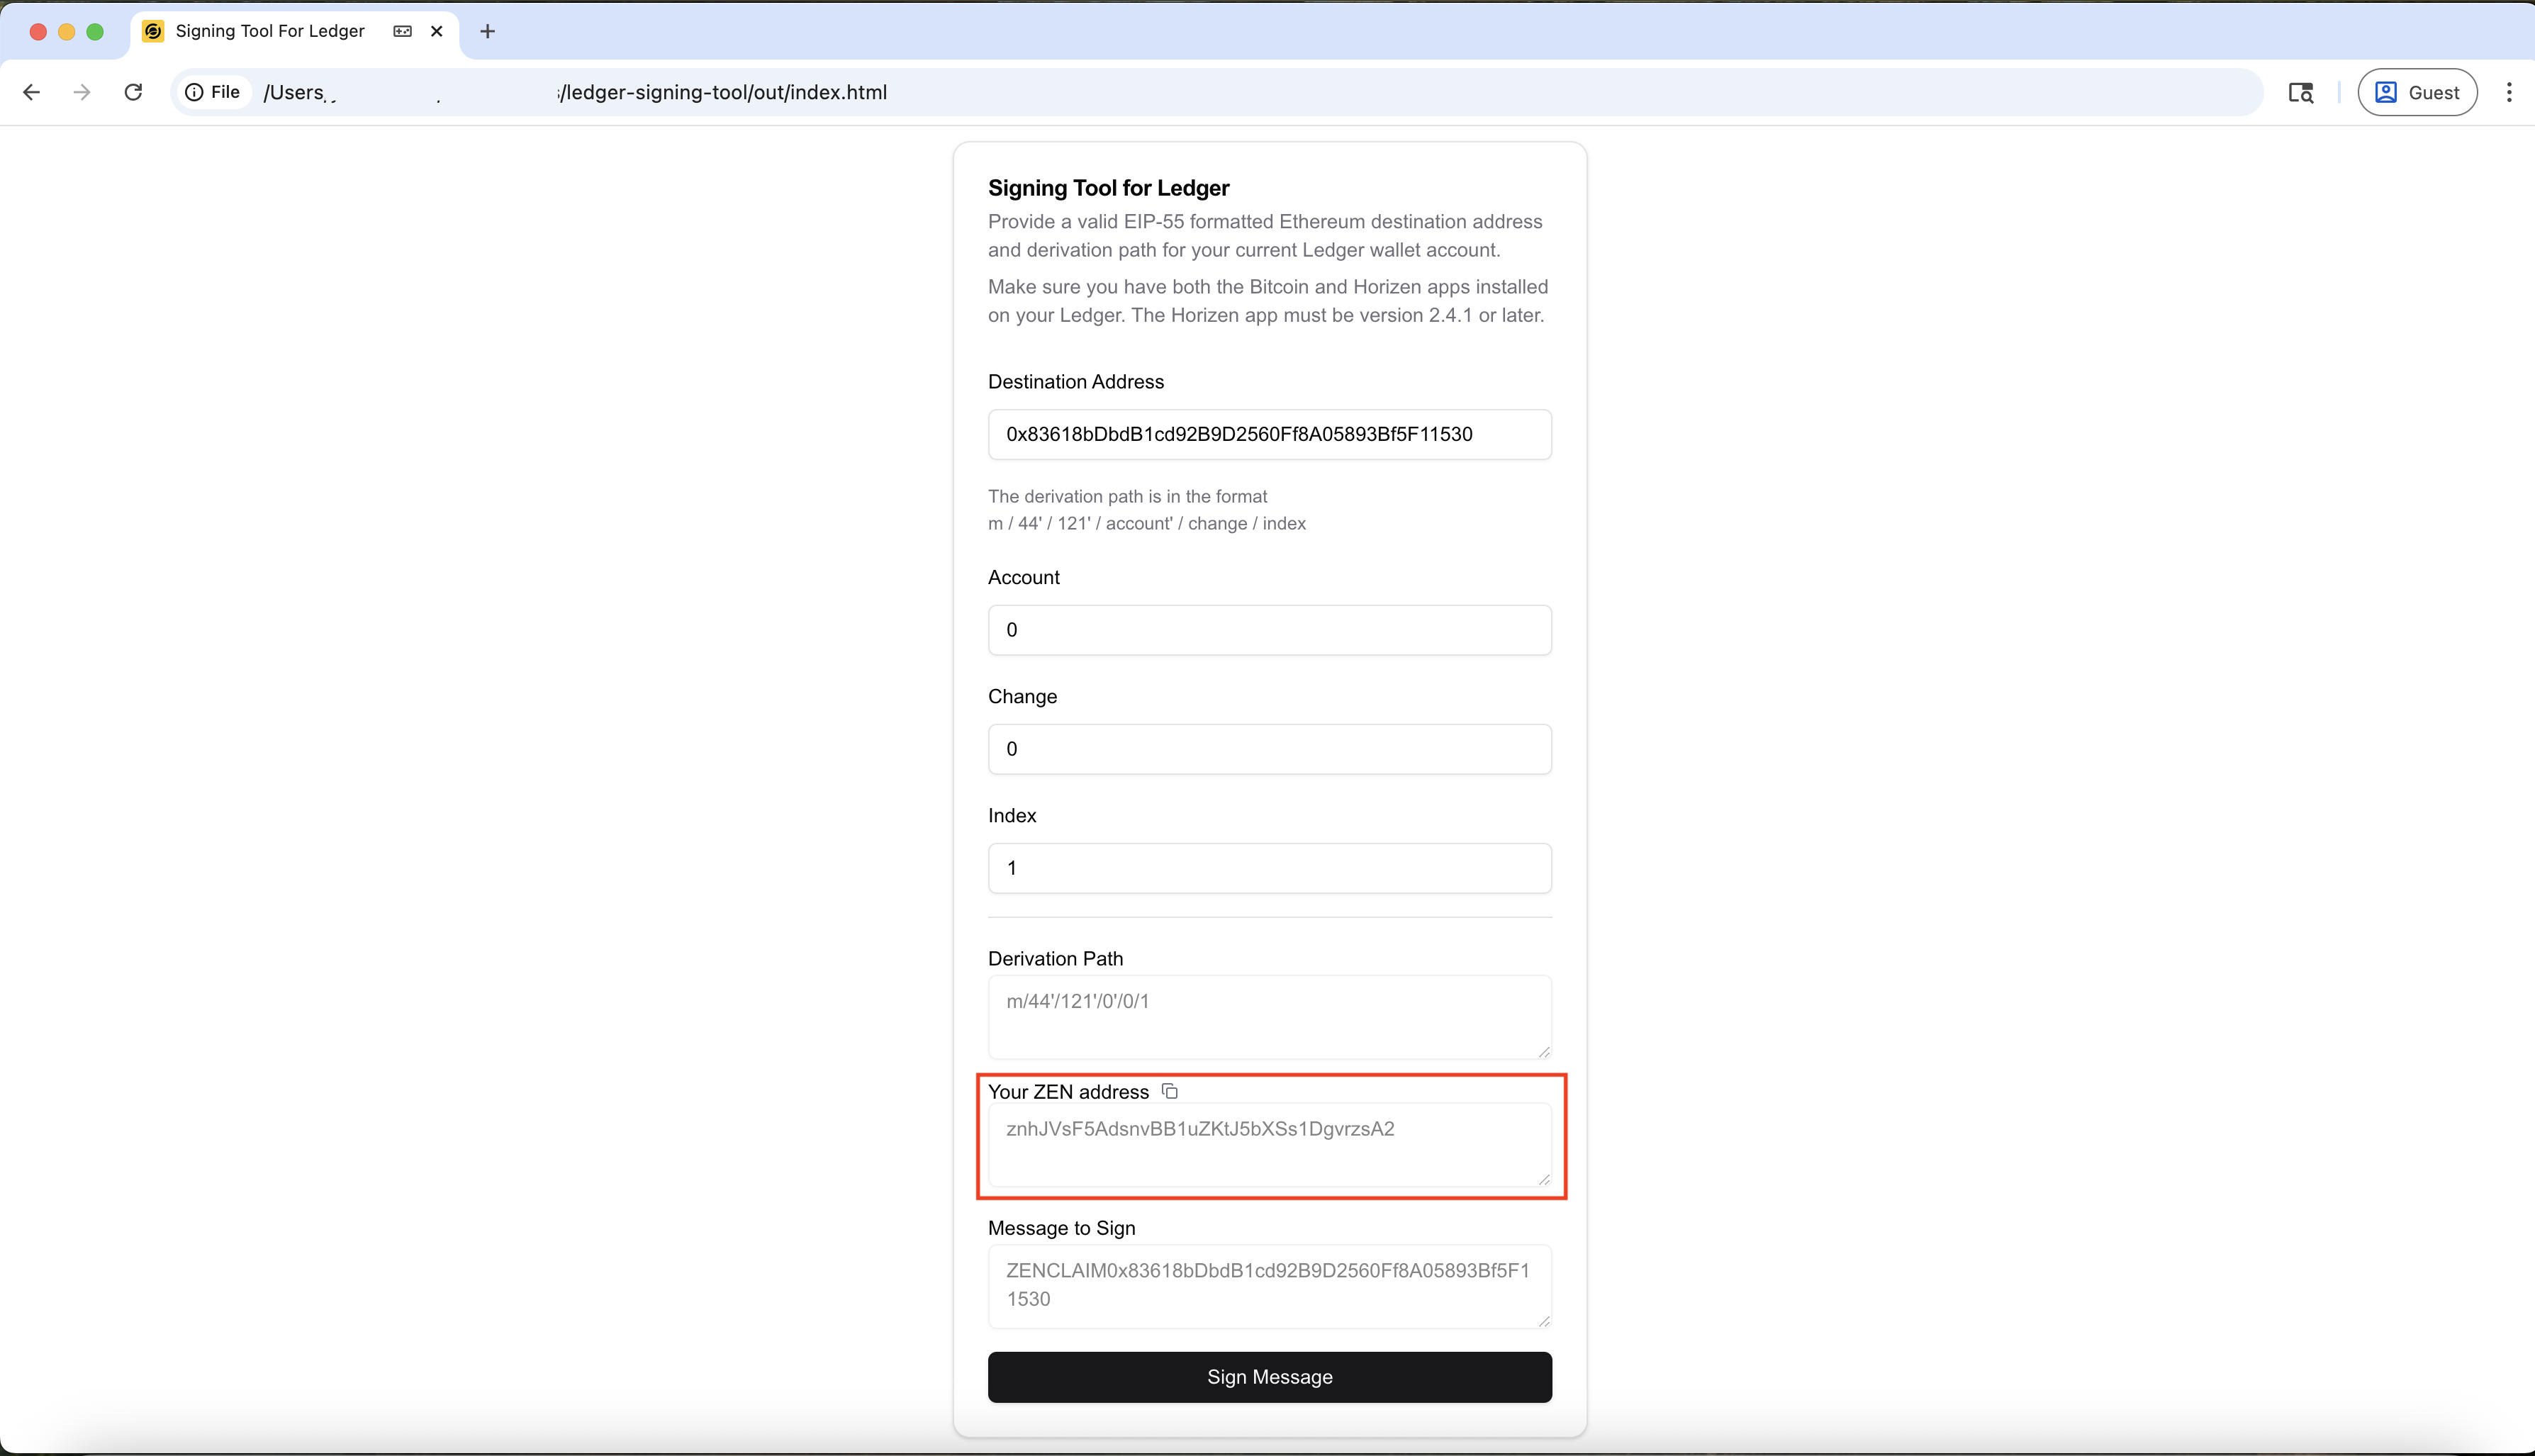
Ledger Signing Tool
If your funds are stored on a Ledger hardware wallet, use the Ledger Signing Tool.
Note: For security, we recommend downloading the tool and running it offline. Download and extract the static files here, then open
index.htmllocally.
Prerequisites
- Install both the Bitcoin and Horizen apps on your Ledger device.
- Ensure the Horizen app version is v2.4.1 or higher.
Signing Instructions
-
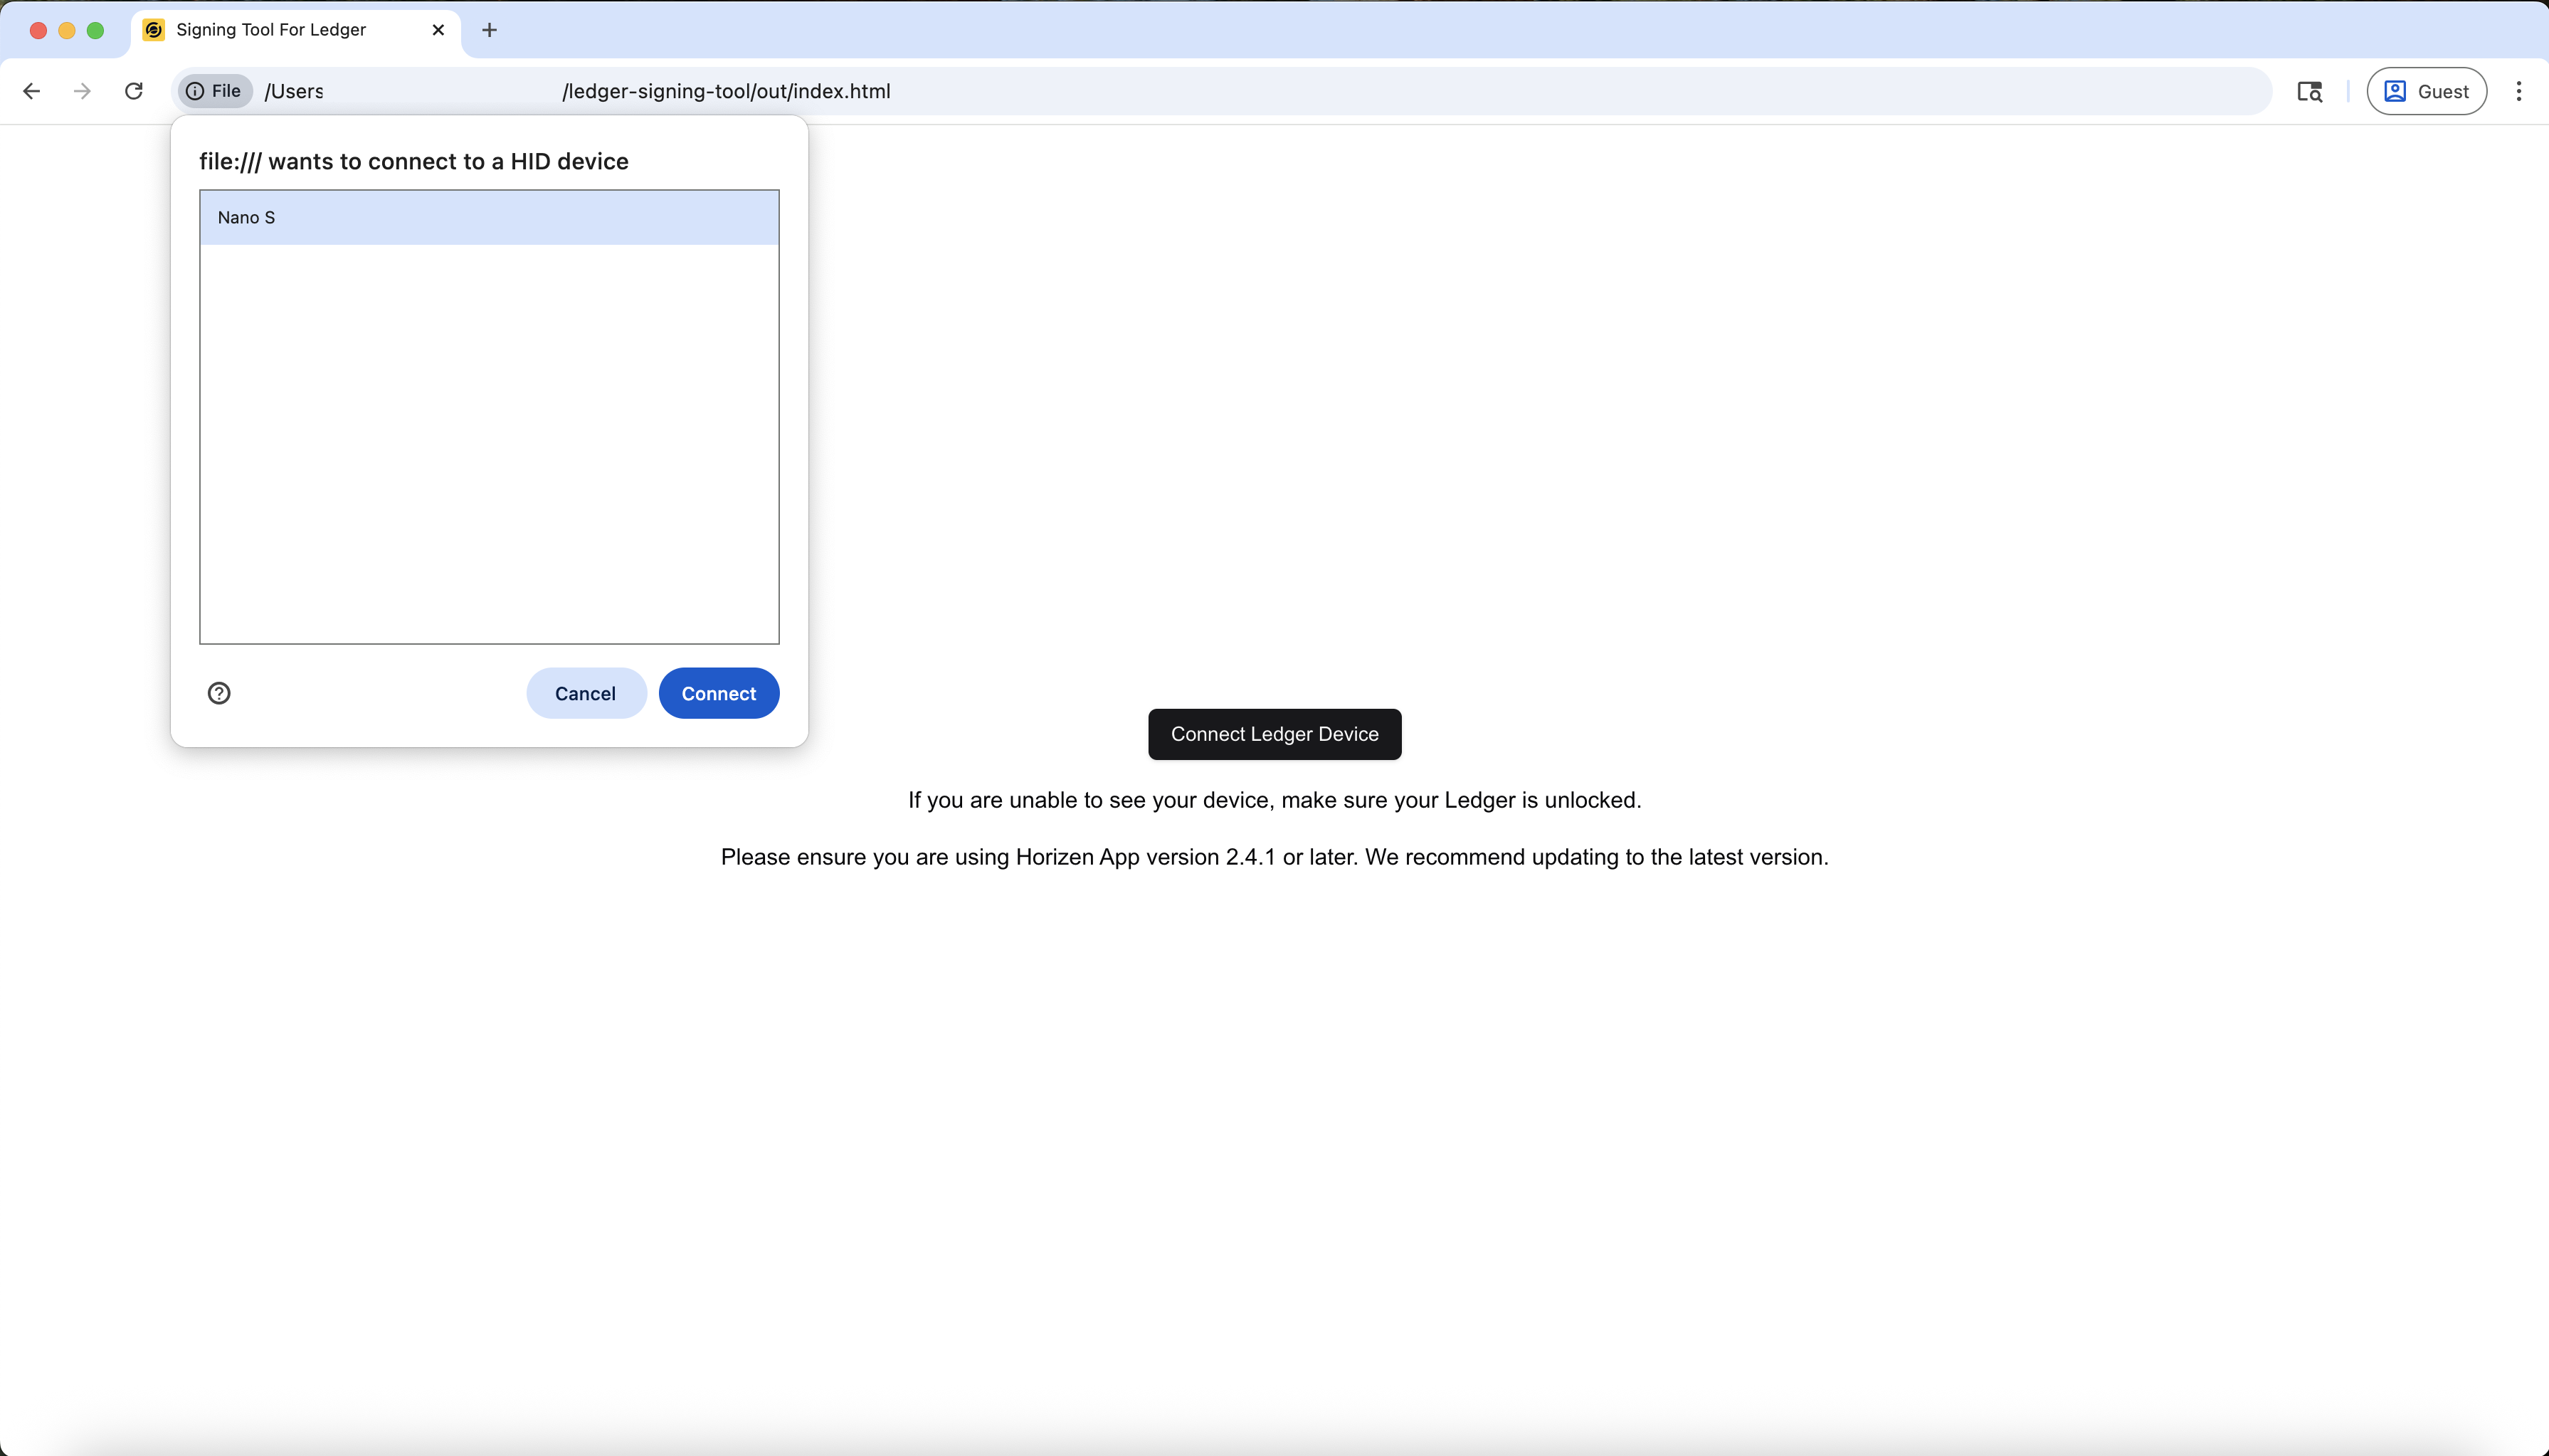
Connect Your Ledger Device
Connect your Ledger device and open the Horizen app. Ensure the device is unlocked and displays "Application is ready" on the screen.
-
Launch the Ledger Signing Tool
Open the Ledger Signing Tool and click Connect.
Make sure your Ledger device is unlocked, and the Horizen app is open. The Ledger screen will show "Application is ready".
-
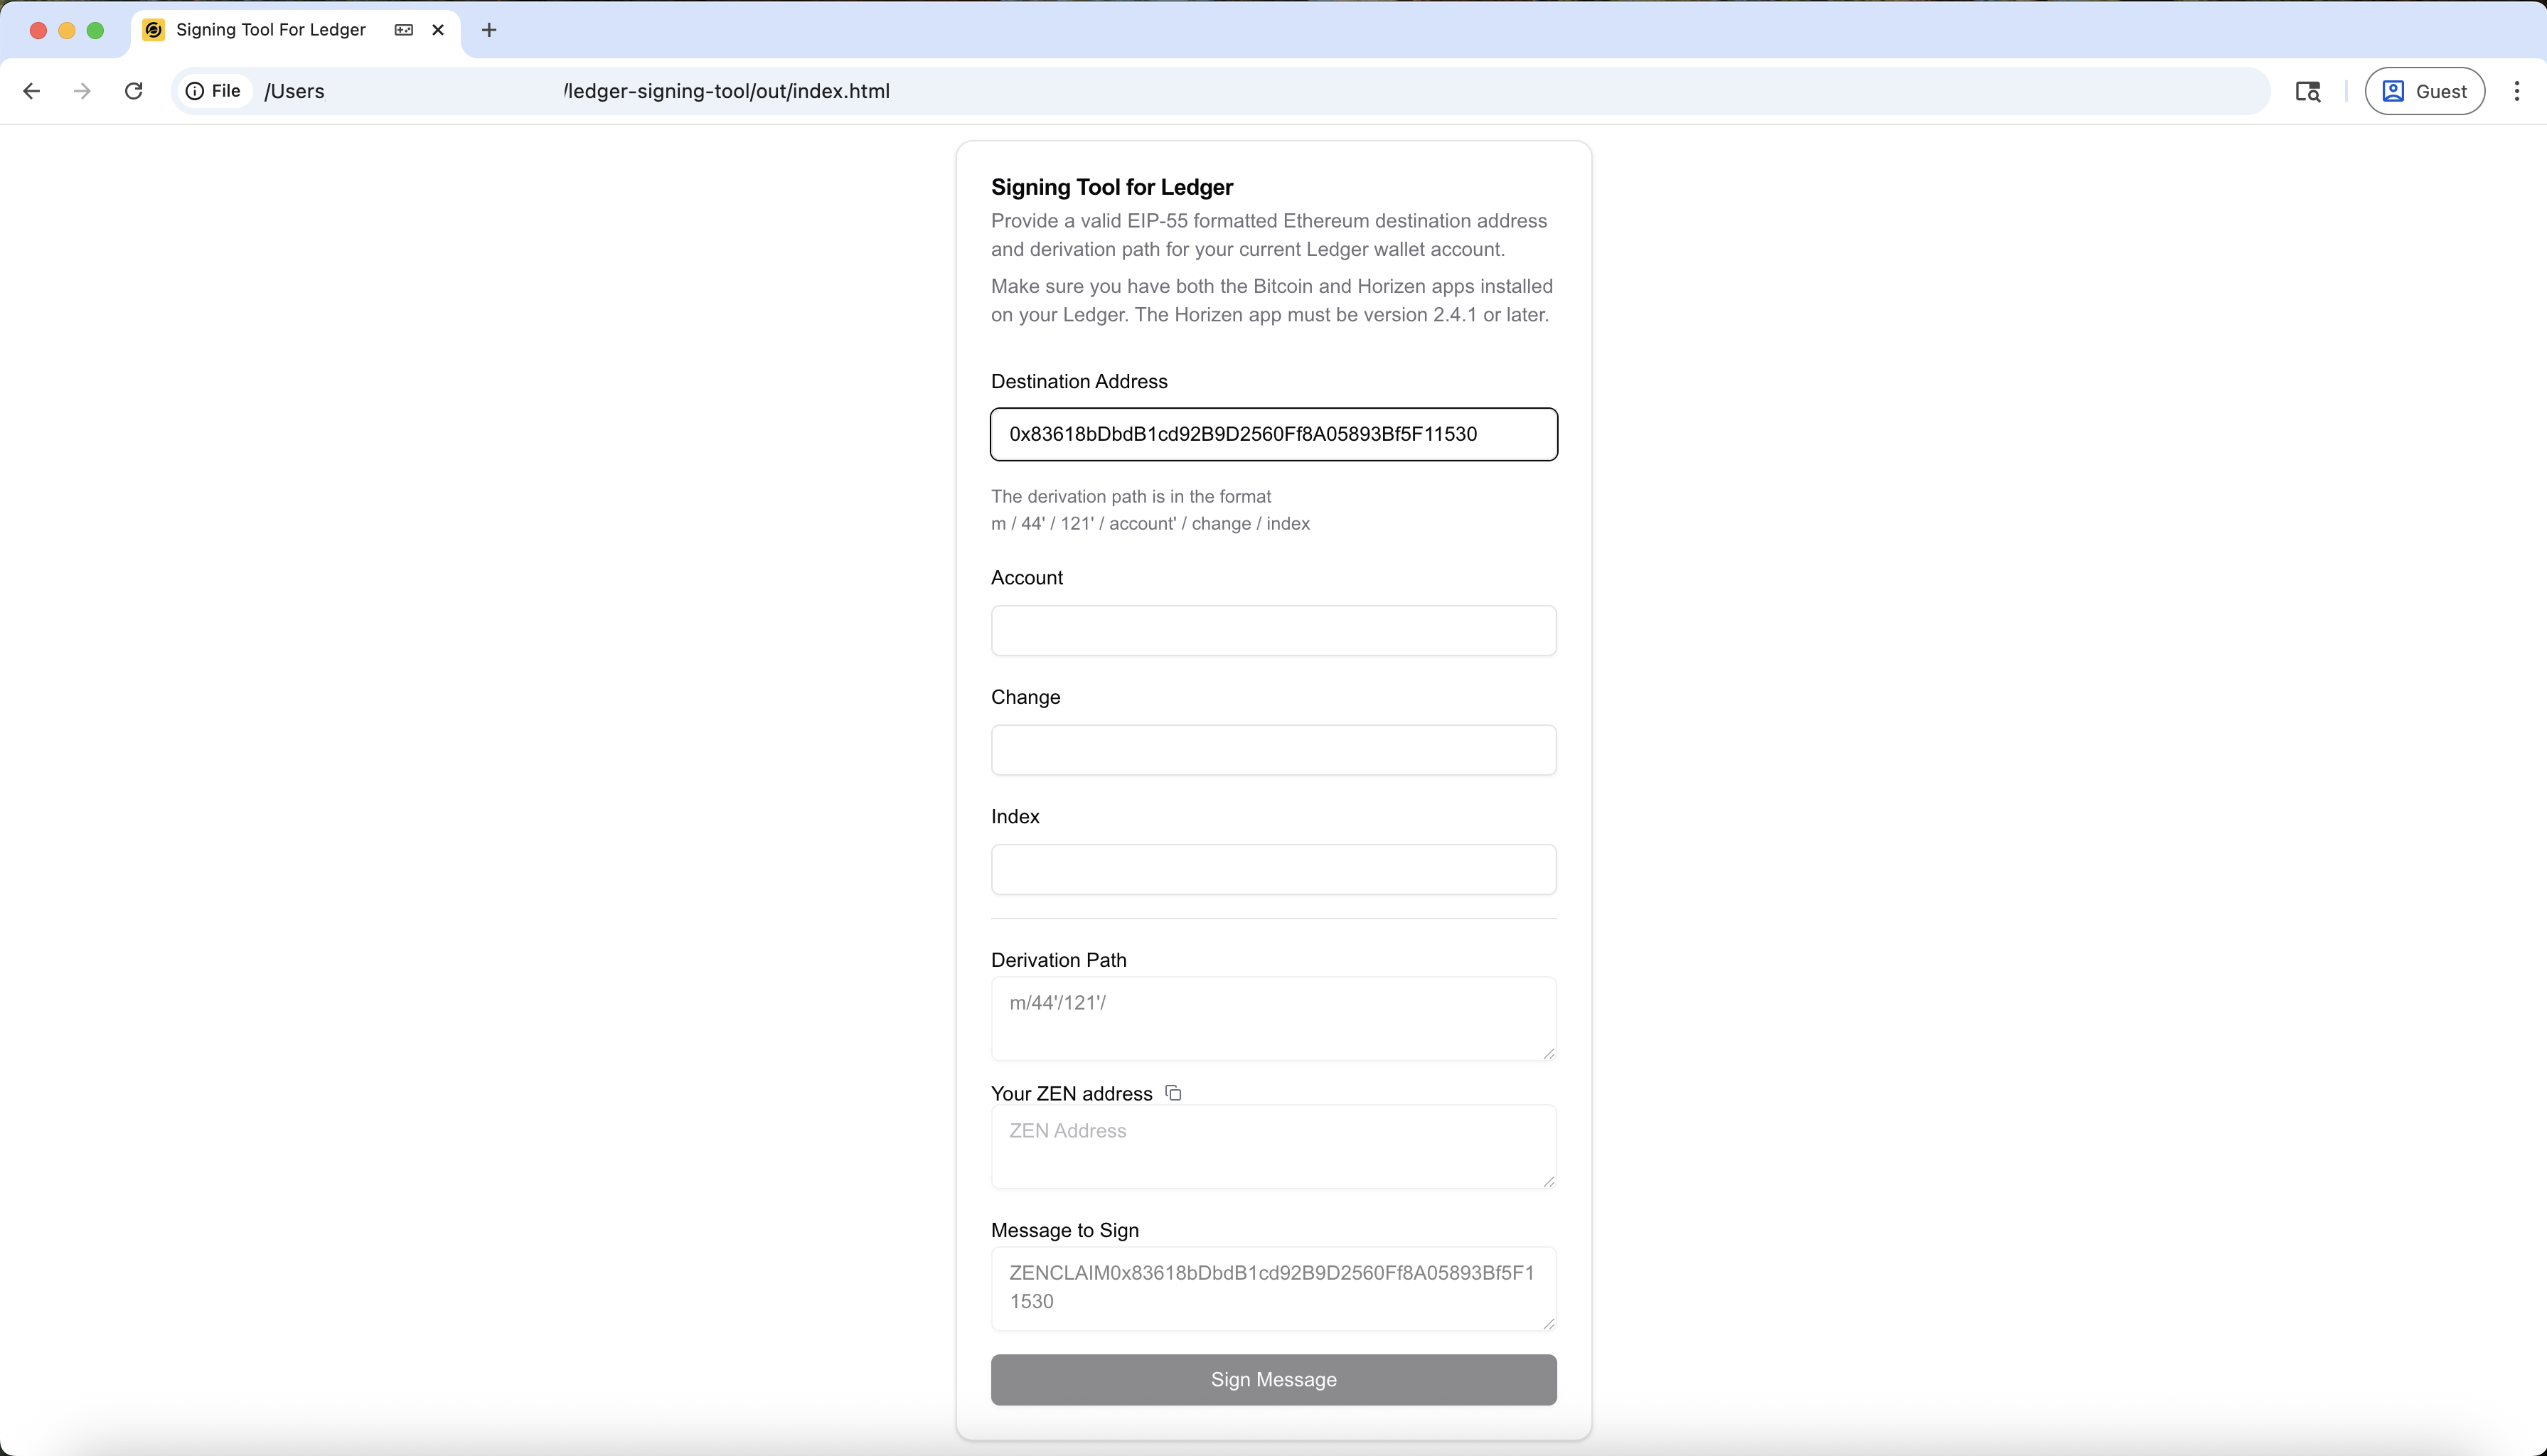
Enter the Destination Address
Enter the destination address. This is the EVM address that will receive the migrated ZEN tokens. The "Message to Sign" will auto-populate.
-
Locate and Adjust the Derivation Path
Enter the derivation path for the ZEN address being claimed from.
To find this:
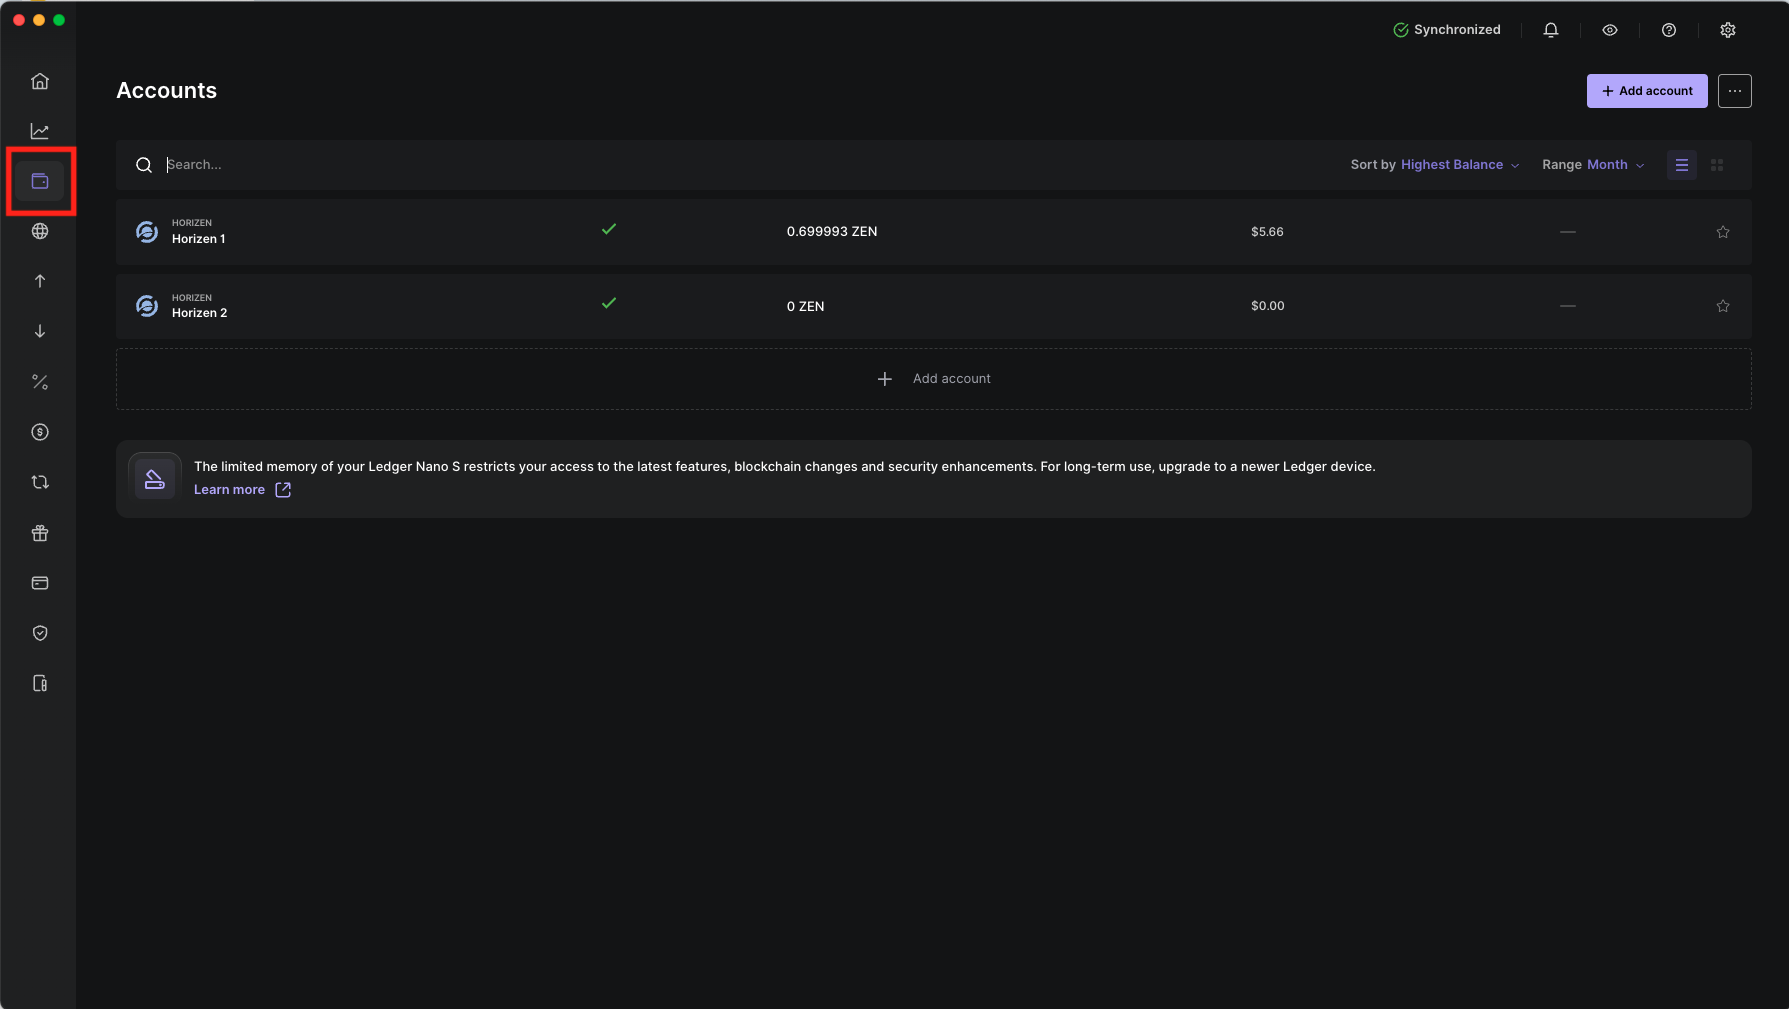
- Open the Ledger Live app
- Go to the Horizen account to claim from
- Click Edit Account → Advanced
- Note the
freshAddressPath


About Derivation Paths
Ledger uses the following format for HD wallet derivation:
m / purpose' / coin_type' / account' / change / address_indexFor Horizen, the derivation path is:
m / 44' / 121' / account' / change / address_indexchangeis:0→ receiving address1→ change address
address_indexis the index of the address under that account
Understanding
freshAddressPathLedger shows the next unused address as the
freshAddressPath.To find the last used address:
- Subtract
1from theaddress_index.
Example
If thefreshAddressPathism/44'/121'/0'/0/5
Then the last used receiving address ism/44'/121'/0'/0/4Important: Check All Possible Addresses
To ensure no funds are left behind:
-
Scan backwards from the
freshAddressPath, checking each:address_index(e.g., 4, 3, 2, 1, 0)- for both
change = 0andchange = 1
-
This means you should check all paths like:
m/44'/121'/0'/0/4m/44'/121'/0'/1/4m/44'/121'/0'/0/3m/44'/121'/0'/1/3...
This ensures you catch both receiving and change addresses that may have ZEN balances.
-
Verify the ZEN Address
Paste each derived ZEN address into the Horizen Explorer to check the balances.
-
Sign the Message
Click Sign Message and confirm the message on your Ledger device. Copy the generated signature.
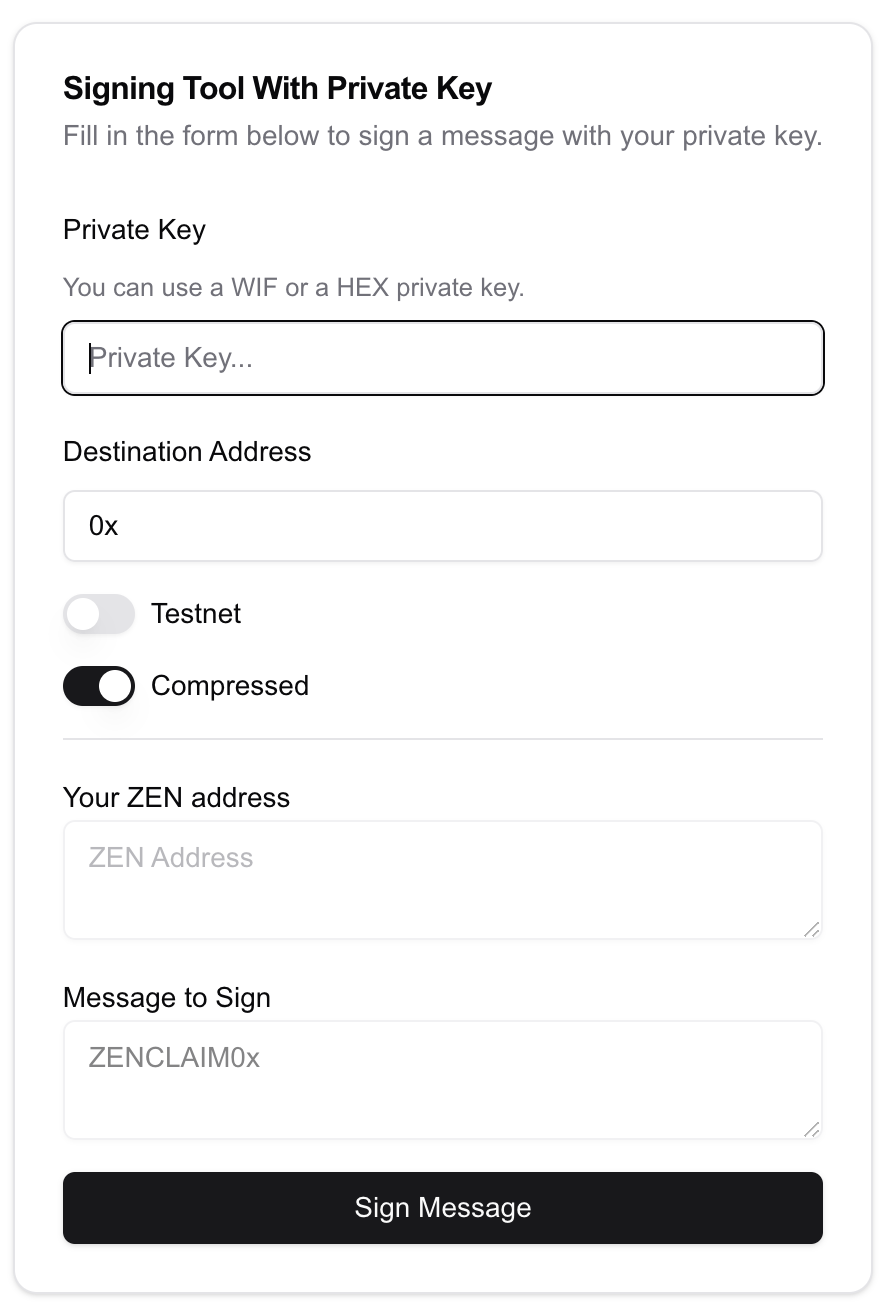
Private Key Signing Tool
If you have direct access to your private key, use the Private Key Signing Tool.
If you only have your seed phrase, you'll need to derive your private key using a tool such as Ian Coleman's BIP39 tool. For security, always use this tool offline by downloading the bip39-standalone.html file from the official GitHub release. After downloading, open the file in a web browser with your internet connections disabled. Be sure to select the Coin to "ZEN - Horizen" in the dropdown.
Note: For security, we recommend downloading the tool and running it offline. Download and extract the static files here, then open
index.htmllocally.
-
Enter your private key and confirm the ZEN address is correct.
-
Enter the destination EVM address. The "Message to Sign" will auto-populate.
-
Click Sign Message to generate and copy the signed message.
CLI Tool
The CLI tool provides functionality for signing and verifying messages. It also supports claiming tokens from ZEN addresses, both standard transparent and multisignature addresses (see below). The CLI can be used directly from the command line or imported as a module into a Node.js project.
Available Commands
-
signmessageSign a message with a ZEN private key. -
verifymessageVerify a signed message against a ZEN address.
For detailed usage examples and other supported commands, refer to the GitHub README.
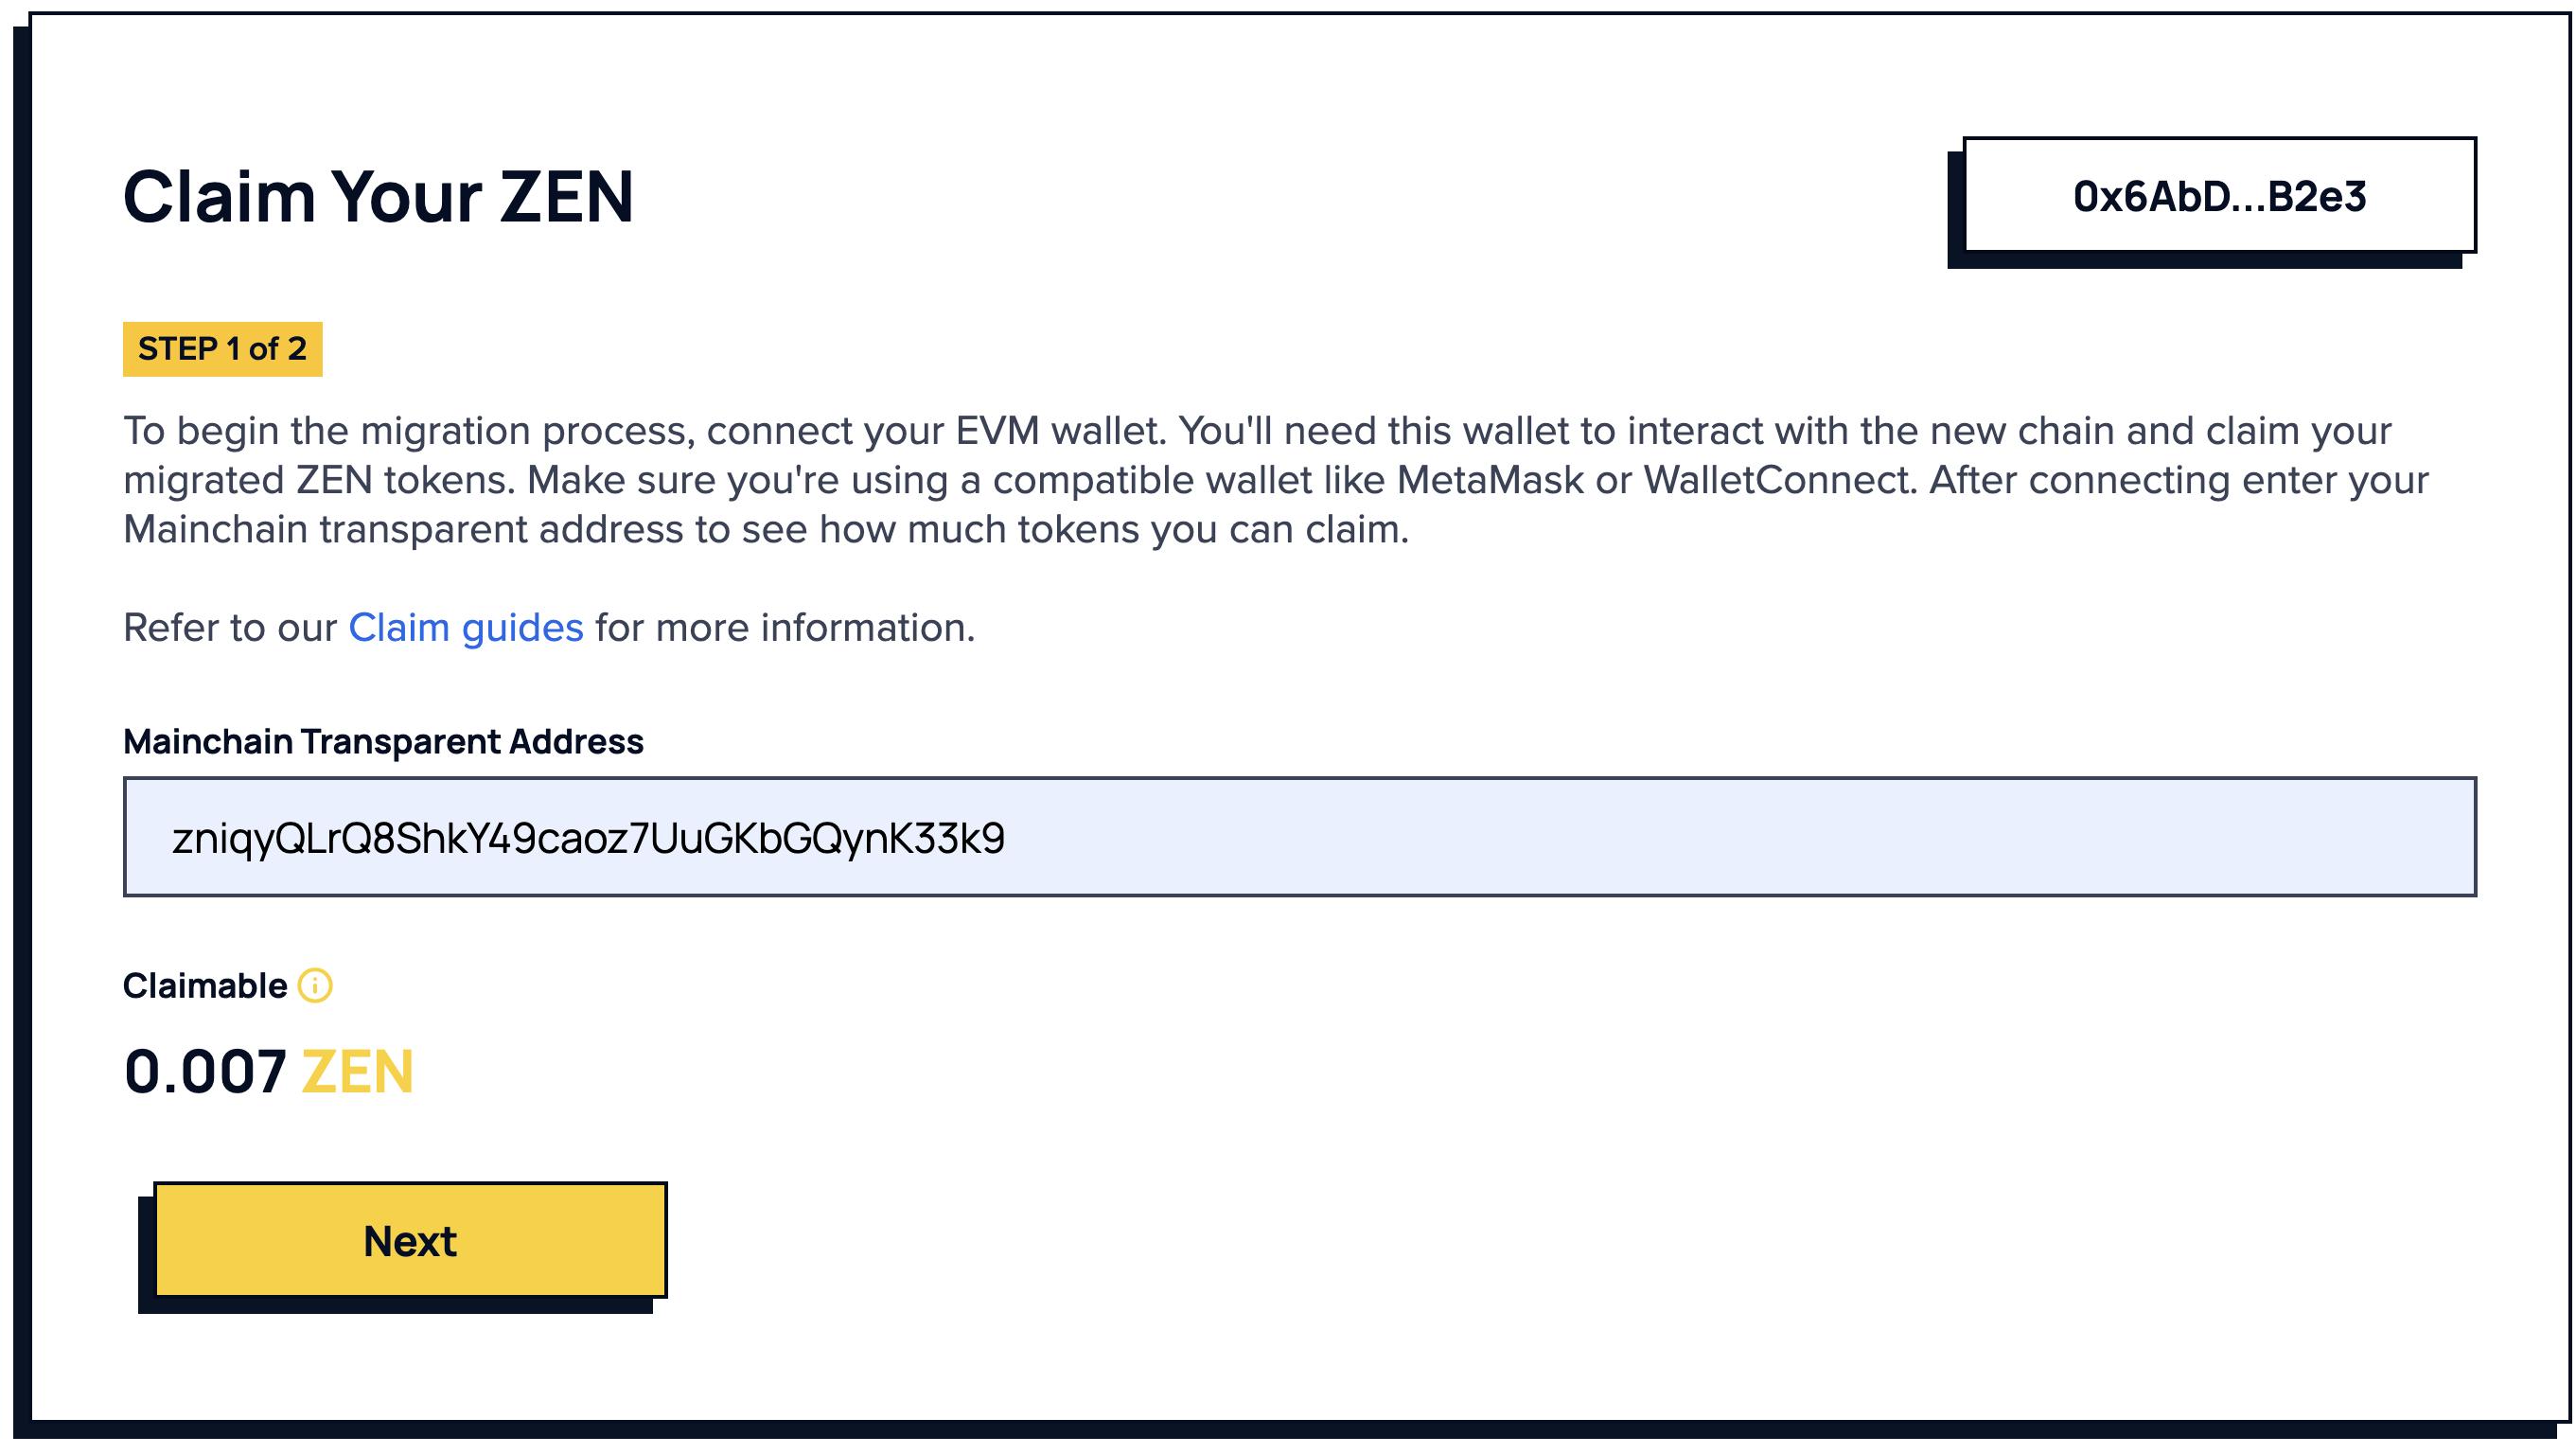
Claim Process
Once you have a valid signature, use the claim interface to submit your request.
Claim Page
You can claim ZEN directly through the official web interface:
- Mainnet Claim Page: https://horizen.io/zenclaim
-
Connect Wallet
Click Connect Wallet and choose your provider (e.g., MetaMask). Make sure you're connected to Base Mainnet.

Instructions for connecting to Base Sepolia Testnet (if not already set up)
Click on the "Add Custom Network" from the network dropdown and enter in the following credentials
Network Name: Base MainnetRPC URL: https://mainnet.base.orgChain ID: 8453Symbol: ETHBlock Explorer URL: https://basescan.org -
Import Token Make sure to import either tZEN (if on testnet) or ZEN (on mainnet) so that the tokens appear in Metamask. Under the tokens tab select the "Import Tokens" button and enter the following for the appropriate environment.
Base MainnetContract: 0xf43eB8De897Fbc7F2502483B2Bef7Bb9EA179229Symbol: ZEN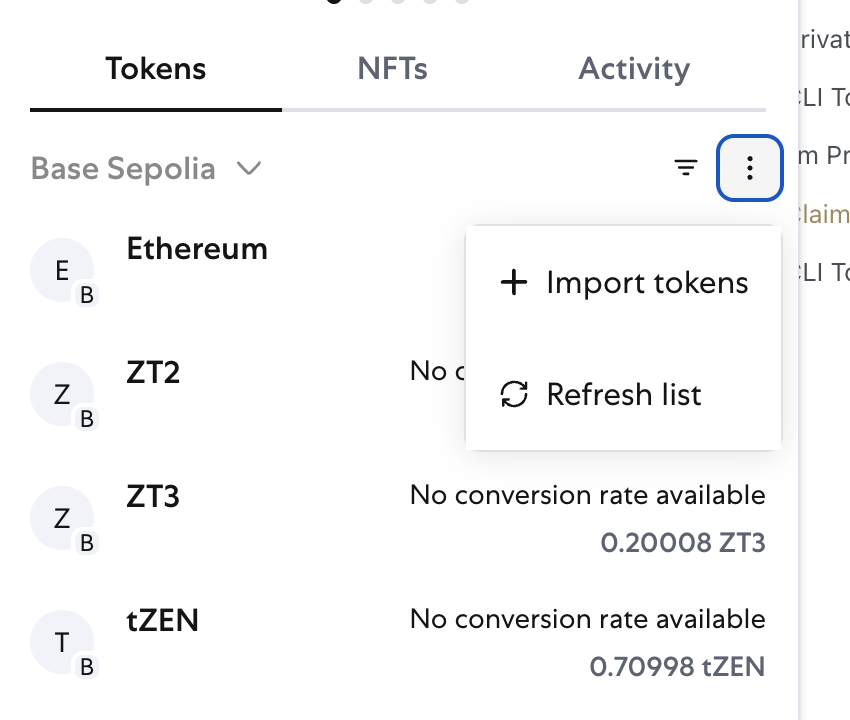
-
Enter ZEN Address
Input your Horizen Transparent Address (e.g., from Sphere). The interface will display your available ZEN balance. Click Next.
-
Paste Signature and Destination Address
- Paste the signed message (see the options above) into the signature field
- Enter the destination address address where you want to claim the $ZEN tokens. Note that this should NOT be an exchange deposit address. You can enter the same connected wallet address here.
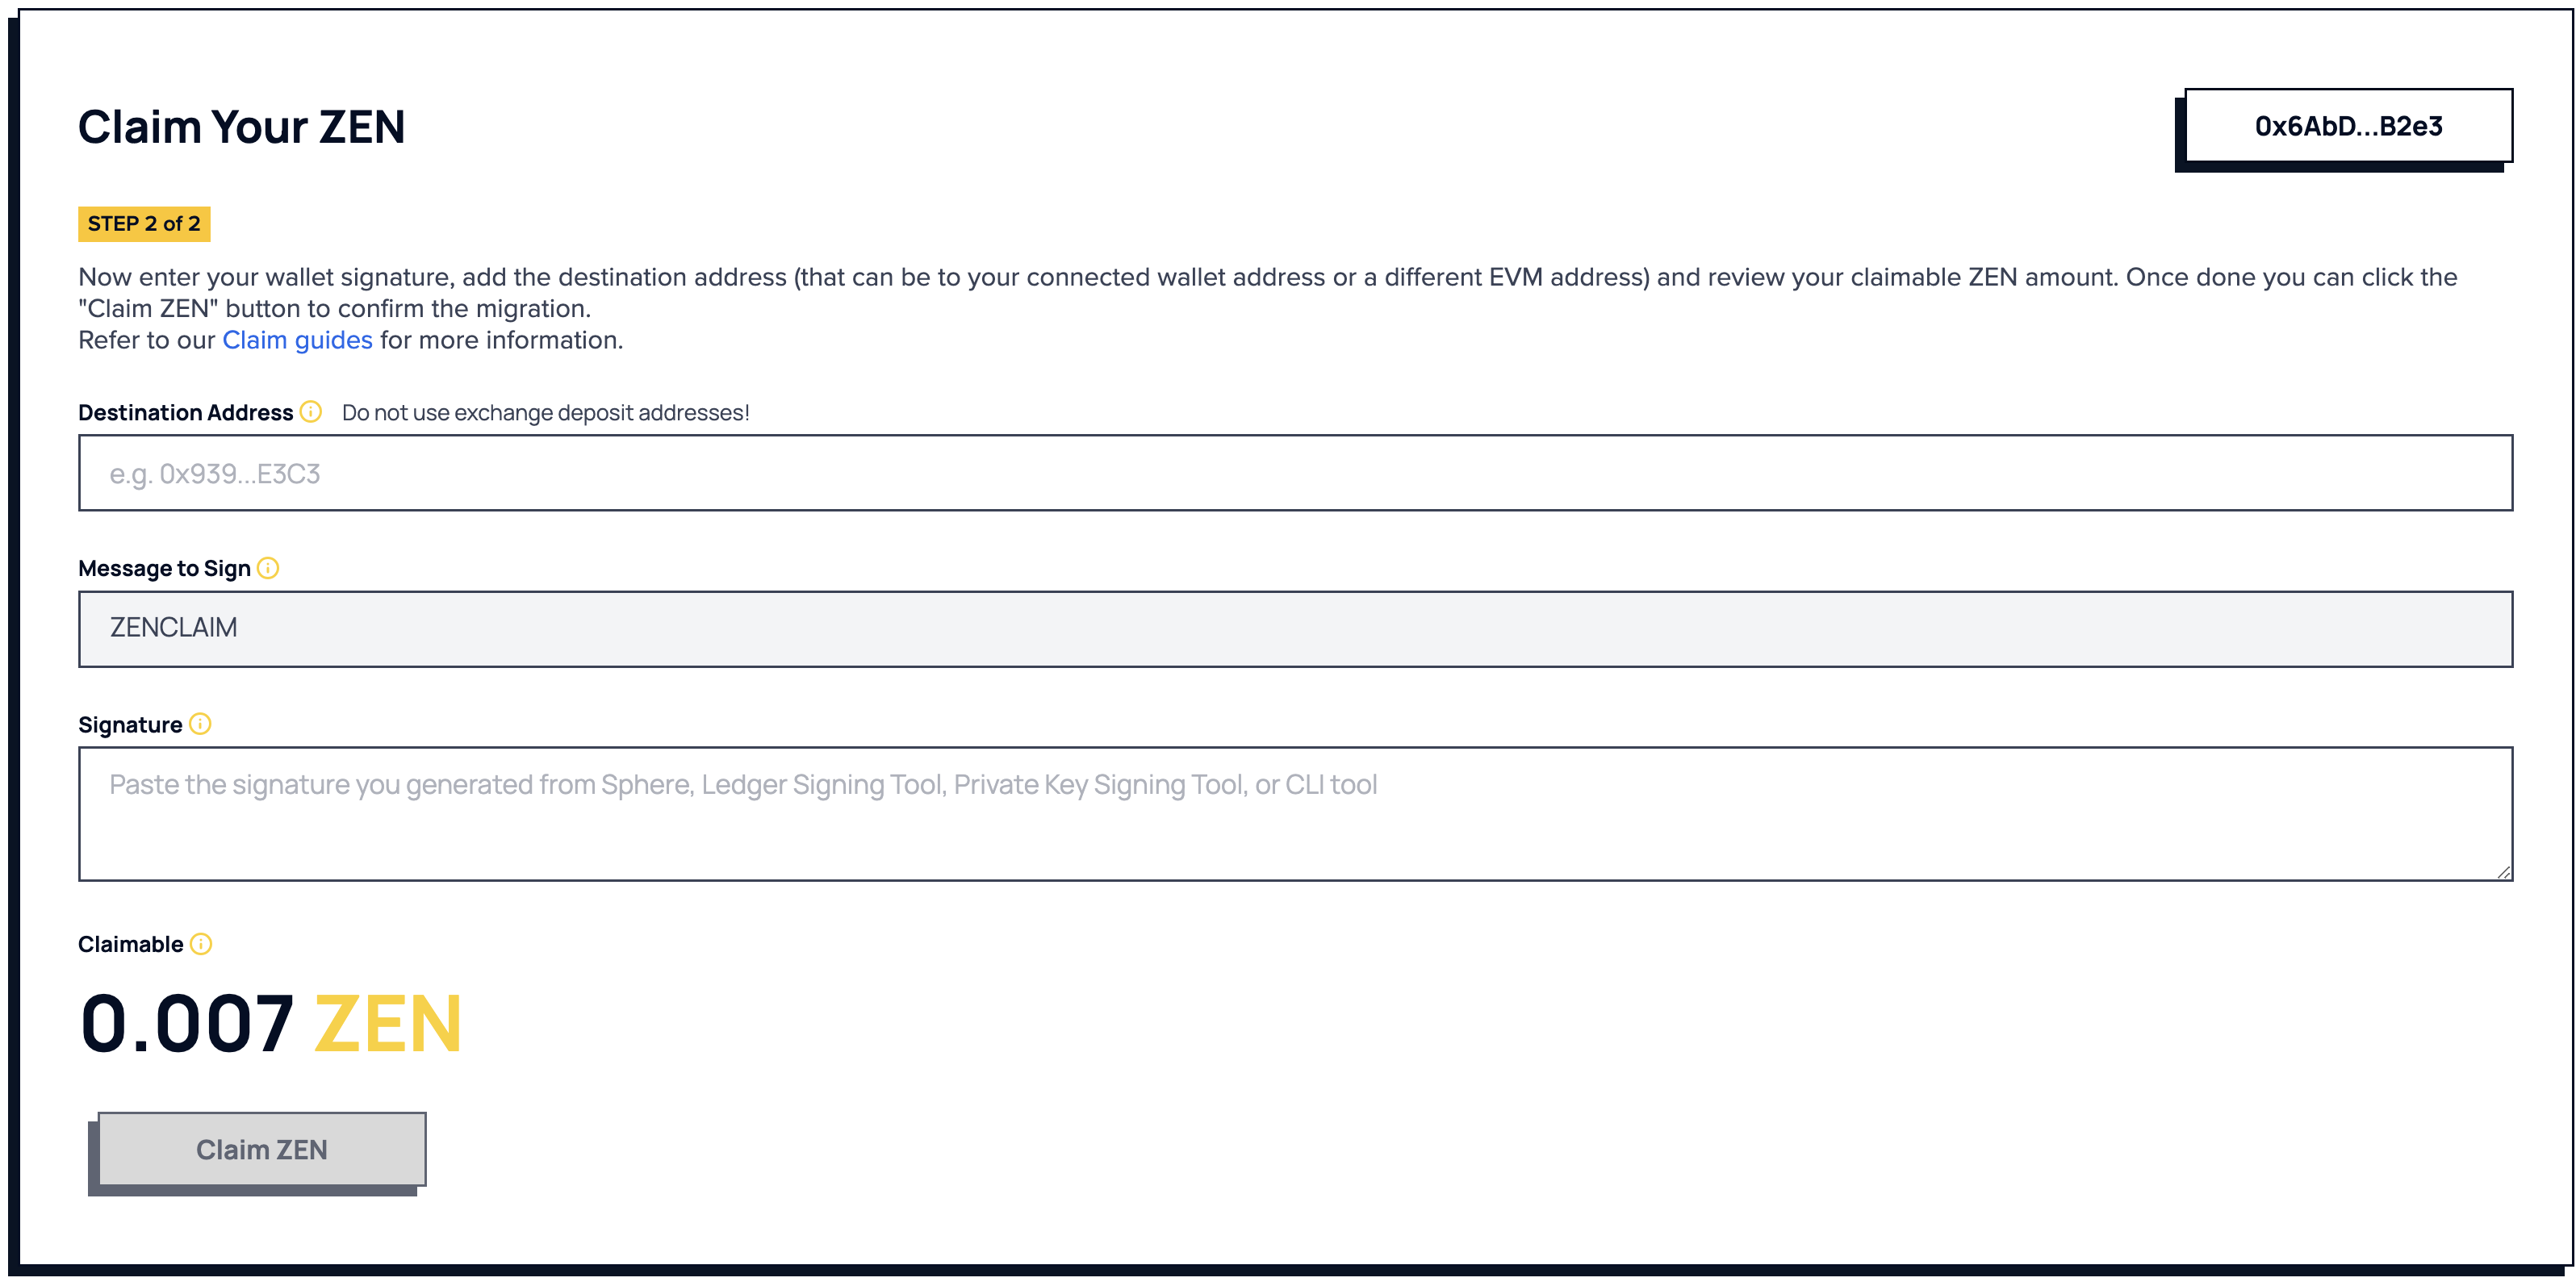
-
Submit Claim
Click Claim to initiate the transfer of $ZEN from the Horizen chain to the Base Mainnet.
CLI Tool
The CLI tool provides functionality for claiming tokens from ZEN addresses, both standard transparent and multisignature addresses. It also supports signing and verifying messages (see above). The CLI can be used directly from the command line or imported as a module into a Node.js project.
Available Commands
-
claimzenaddress
Claim tokens from a transparent ZEN address. -
claimzenmultisigaddress
Claim tokens from a multisignature ZEN address.
For detailed usage examples and other supported commands, refer to the GitHub README.